Bike and Scooter parking
Frequently asked questions
Providing bike and scooter parking facilities in easily accessible and visible places demonstrates your commitment to active travel and encourages families to support their children to cycle and scoot to school. The information below will assist you when considering an upgrade to current facilities and/or creating new parking areas for your students or click here for a Bike and Scooter Parking pdf.
Demand
- Take into account not only the number of students who currently ride, scoot or skate but also the potential for increased interest once you have completed the work and continue to develop an active travel culture.
Location
- Select a site within easy access of a school entrance.
- Avoid any conflict of movement between bike/scooter users and vehicles. e.g make sure that they do not need to cross a car park or delivery entrance.
- Site the storage in an area easily visible from the school office/classrooms.
Budget
- Maximise your budget by using;
- an existing sheltered area (or incorporate a purpose built shelter within a current building)
- an existing sealed surface to save on concrete or paving costs
- an existing wall as the attachment point for fences and roofing
- galvanized steel (for rails) which is cheaper than stainless steel and can be painted.
- Maximise your budget by using;
Design
- Use a layout that maximises available space. Consider using more than one area for parking.
- Is formal security required? In many instances choosing an easily observed spot suffices. If not then consider;
- locking individual bikes and scooters to the parking rails
- securing all bikes and scooters with a long plastic coated chain and lock
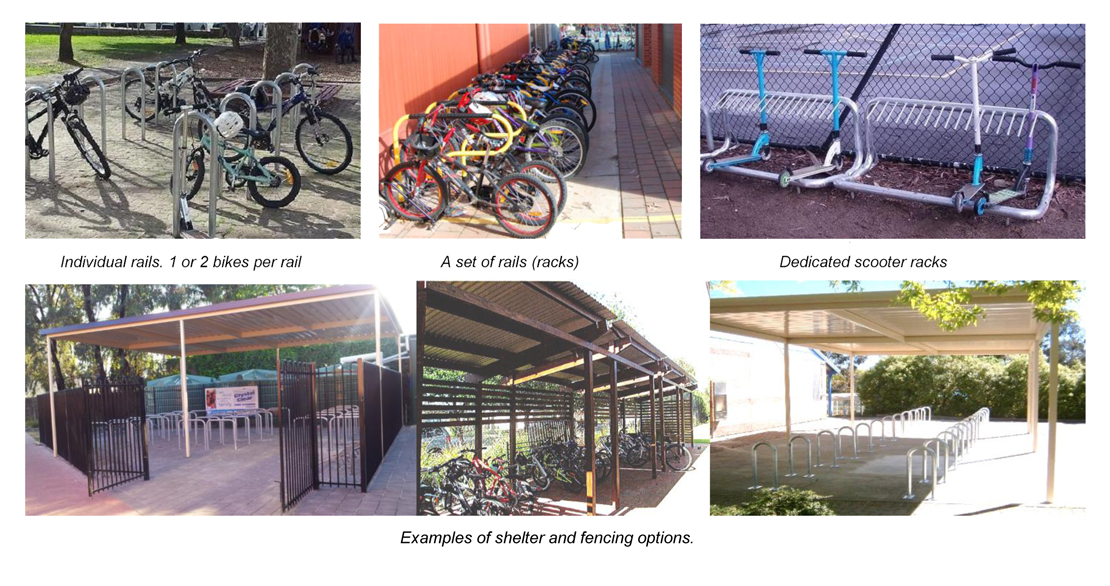
- a fenced area (1800mm high chain fence, timber slat walls or pool fencing with a lockable gate). - Create an inviting and friendly space by using signage, artwork and landscaping.
- Provide a mixture of bike and scooter parking options.
- Consider short term parking for adults who accompany children on bikes.
Rails or racks?
- Bike parking should be guided by the Australian Standards (AS 2890.3:2015).
- The amount of space available and layout of the area will determine your options. You may want to use a combination of both rails and racks determined by what best meets student needs. Student bikes are generally smaller than adult bikes and so smaller rails can be used.
- Bike rails should;
- support the frame and wheel/s (where possible) not just the front/rear wheel.
- have base plates welded to the bottom of each leg and be bolted to a concrete surface
or
- be long enough and set in concrete footings.
Parking layout

- Provide enough space for a student to safely wheel their bike in and out of the parking area without damaging their own or someone else’s bike.
- Rails
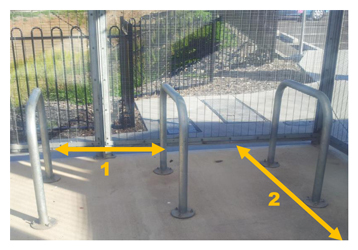
- allow space for two bikes (one on each side of a rail) providing minimum 1.2 metres between rails 1
- provide clearance for the bike at both ends of the rail/rack (total clearance length 1.7 metres) 2
- secure to a solid floor or wall ("Dyna" bolt to concrete and bitumen surfaces, concrete into paved surfaces). - DIT Way2Go team and / or parking suppliers can assist with different layout options to maximise space and access. Your facilities manager or facilities management officer may also be able to assist.
Permissions / approvals
- Structures over a certain size or located close to boundaries may require local or state government development approval. Confirm this with the supplier, your local council and/or your school facilities management officer.
School examples


